
Overview
Transfer journals are used to record stock movements between two locations in Resico ERP.
Each journal contains a header with the transfer information and one or more lines representing the products and quantities that should be moved.
Only approved transfer journals affect inventory balances.
Who Can Use This
Access to transfer journals is controlled in the Administration → Users permissions tree. Users need the view Transfer journals right to see the journal list and the edit Transfer journals right to create, modify or approve journals. Additional rights such as export Transfer journals and undo approve Transfer journals may be assigned as needed.
Preconditions
- Locations: At least two locations must be configured in Retail Setup → Locations.
- Products: Items you wish to transfer must exist in the product list. The system does not check available stock during a transfer; transferring more than the current stock will result in negative inventory at the source location.
- Units of Measure and VAT groups: These are maintained in Retail Setup → Units and VAT Groups.
- Optional Setup: If you plan to use the Transporter field or notes column, decide on your notation conventions in advance.
Navigation
To access the transfer journals list:
- ERP → Journals → Transfer Journals – opens a list of existing transfer journals with filtering and export options.

Step‑by‑Step Process
Viewing the Transfer Journal list
- Go to ERP → Journals → Transfer Journals. A table lists existing journals with columns for Journal Code, Journal Name, Number of lines, Amount, Status, Approved date, Transfer date, Modified by, From location and To location. An Actions column provides buttons such as Edit for open journals and View entries for approved journals.
- Use the Status dropdown to filter journals by Open or Approved. The search box filters by journal code or name, and the column menu (blue button) lets you choose which columns to display or rearrange.
- Select the green Export button to download the list as an Excel file.
Creating a new transfer journal
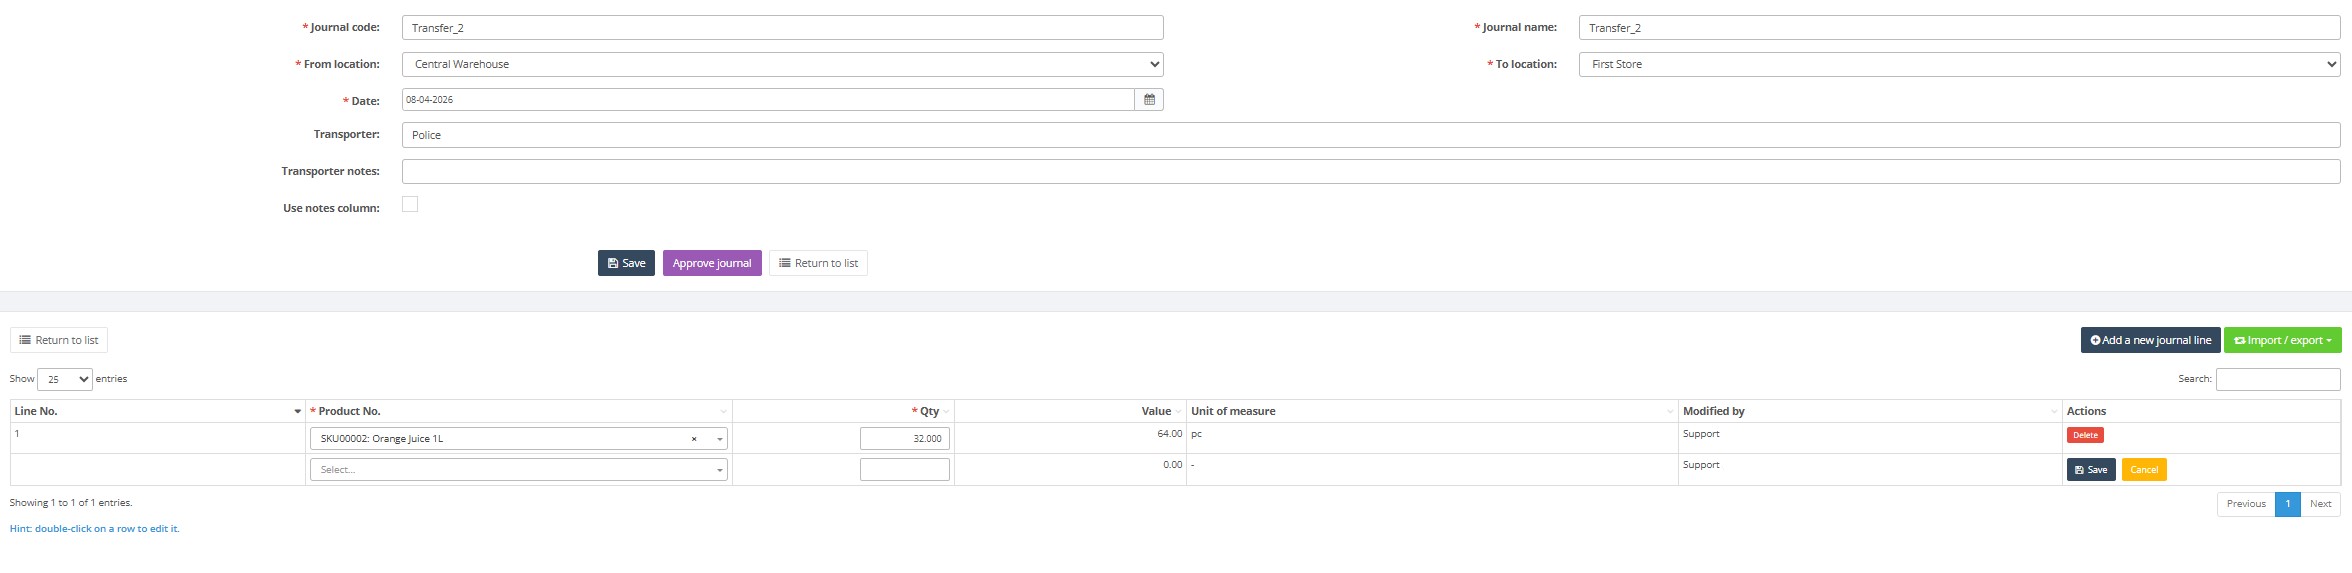
- From the list page, click Create new transfer journal. A blank journal header appears.

- Enter the required header fields marked with a red asterisk:
- Journal code: Enter a unique identifier (up to 40 characters). The system suggests the next available code, but you can change it so long as the code remains unique.
- Journal name: Enter a descriptive name for the transfer (up to 45 characters).
- From location: Select the location from which stock will be taken (code up to 20 characters).
- To location: Select the destination location (code up to 20 characters). The source and destination must be different.
- Date: The transfer date. Choose from the calendar or type in dd‑mm‑yyyy format.
- Click Save to create the journal header. The system displays a confirmation message (for example, “Journal ‘Transfer_18’ was created”) and reveals a lines table with zero entries.
- To add products to the journal, click Add a new journal line. A new row appears with the following mandatory fields:
- Product No. – begin typing a product number, barcode or alias (up to 50 characters) and select the correct product from the drop‑down search.
- Qty – enter the quantity to transfer. Quantities must be positive numbers (decimals allowed) because the system automatically creates negative and positive postings for the From and To locations.
- Repeat the previous step to add additional lines. You can also use the Import / export dropdown to:
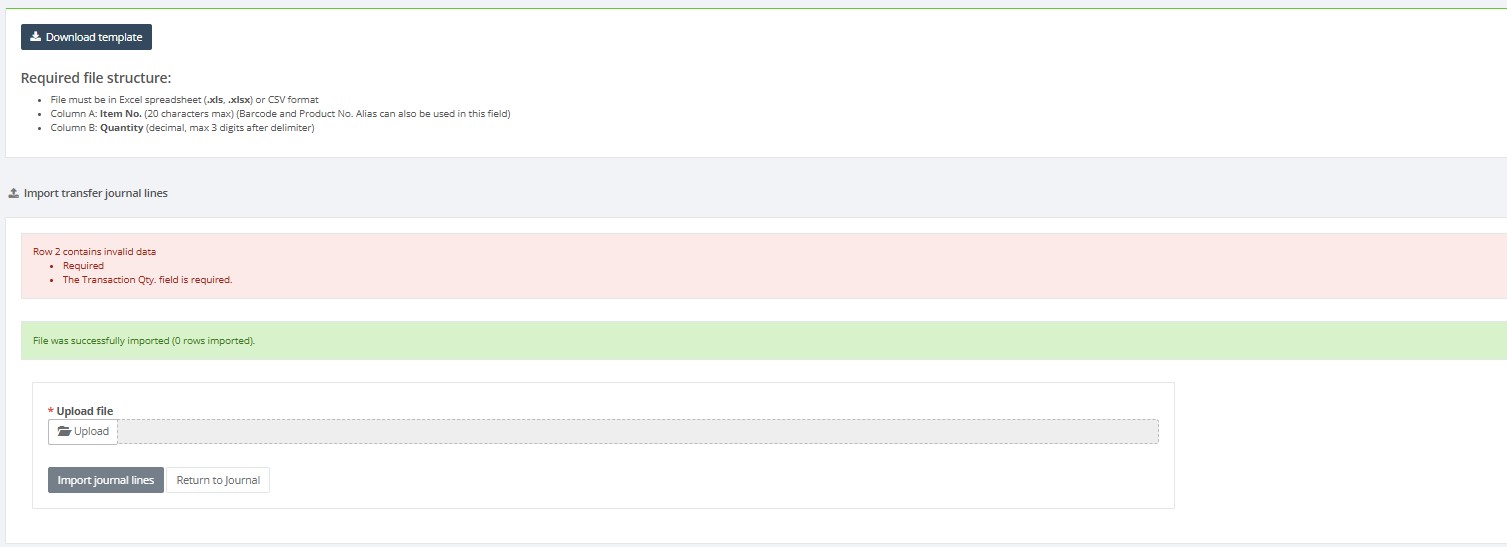
- Import journal lines from an Excel template. The import file must be in XLSX format and have two columns: Item No and Quantity, in that order. The system matches the Item No to product numbers, barcodes or aliases and creates two postings (negative at the source, positive at the destination). Quantities must be numeric and positive; duplicate items in the file are combined.
- Export journal lines to XLSX or PDF (with or without prices).
- Once all lines are added and validated, click Approve journal. Only approving a journal updates stock levels between the selected locations.
- Use Return to list to go back to the journal list.
Editing an open transfer journal
- In the list, click the green Edit button for a journal with status Open.

- Modify header fields or lines as necessary. You can double‑click an existing line to edit it.
- Delete lines by clicking the Delete button in the Actions column.
- After changes, click Save. When ready to apply the transfer, click Approve journal.
Viewing an approved transfer journal
- In the list, click the blue View entries button for an approved journal.
- The header displays the transfer date, From location, To location and any delivery notes, along with buttons for Export and Undo approve. The Undo approve button reverts the journal to Open status if you need to make corrections.
- The lines table lists each product, quantity, value and unit of measure. Approved journals are read‑only until you undo approval.
Required Fields
- Journal code – user‑defined unique identifier up to 40 characters.
- Journal name – descriptive name up to 45 characters.
- From location / To location – select source and destination locations (codes up to 20 characters); they must be different.
- Date – transfer date in
dd‑mm‑yyyyformat. - Product No. – each line must reference an existing product by number, barcode or alias (up to 50 characters).
- Qty – quantity to transfer; must be a positive number (decimals allowed).
Validation Rules
- Mandatory fields are marked with a red asterisk. You cannot save or approve a journal if any required field is empty.
- Journal code must be unique. The system will prevent duplicates.
- From and To locations cannot be the same.
- Each product line requires a product number and quantity. Quantity must be numeric and cannot be zero.
- Only approved journals update inventory. Saving a journal or adding lines does not affect stock until approval.
- Journal code length is limited to 40 characters; journal name to 45 characters.
- Location codes must correspond to existing locations and be no longer than 20 characters.
- Product identifiers (numbers, barcodes or aliases) may be up to 50 characters.
- Transporter and Transporter notes fields can contain up to 245 characters each.
- If Use notes column is checked, the custom notes column name must not exceed 50 characters; leaving this blank will trigger an error.
Common Errors
- Filters hide journals: On the list page, active filters (status, search term or custom column filters) can hide entries. Use the Clear filter link to reset.
- Missing mandatory fields: Attempting to save or approve without filling required fields triggers an on‑screen warning.
- Duplicate journal code: If you reuse an existing code, the system displays an error and suggests another code.
- Import errors: Importing lines with an incorrect file type, wrong column order or invalid values will fail. Use the provided XLSX template with two columns—Item No and Quantity—and ensure all product identifiers and quantities are valid.
Troubleshooting
- If you cannot edit or approve a journal, verify that its status is Open. Approved journals must be undone before editing.
- If the Return to list button is disabled, ensure you have saved or cancelled any in‑progress line edits.
- If import fails, confirm the spreadsheet matches the provided template. Column headers and data types must align exactly.
Frequently Asked Questions
Why does the transfer journal not change inventory balances?
Only an Approved transfer journal changes inventory balances. Saving the journal or adding journal lines does not move stock.
Open the journal, verify the transfer date, locations and quantities, and then click Approve journal.
Why can’t I approve the transfer journal?
Before approving the journal, check that:
- Journal code, journal name and transfer date are entered.
- From location and To location are selected.
- From location and To location are different.
- The journal contains at least one product line.
- Every line contains a valid product and a quantity greater than zero.
- Any line currently being edited has been saved or cancelled.
- You have permission to edit and approve transfer journals.
Why can’t I edit an approved transfer journal?
Approved transfer journals are read-only.
Open the journal using View entries and click Undo approve. The journal will return to Open status and can be edited again.
Review the locations and journal lines before approving the journal again.
Why can’t I find an existing transfer journal?
An active filter may be hiding the journal.
- Clear the search field.
- Check the selected Status value.
- Remove any active column filters.
- Use Clear filter to reset the journal list.
Why did the source location get a negative inventory balance?
The transfer journal does not prevent transferring more stock than is currently available at the source location.
Before approving a transfer:
- Open the relevant Product Card.
- Open the Balance tab.
- Check the available quantity at the source location.
- Compare the available quantity with the quantity entered in the journal.
- Correct the transfer quantity if necessary.
Can I use the same location as both the source and destination?
No. From location and To location must be different.
If stock must be corrected within one location, use an Adjustment Journal or a Stock Take Journal, depending on the reason for the correction.
Why can’t I find a product when adding a journal line?
Check that:
- The product exists in the Product List.
- The product is active.
- The correct product number, barcode or alias is entered.
- The barcode or alias belongs to the intended product.
- The Product Card has been saved correctly.
Why did the journal line import fail?
Check the import file before trying again:
- The file must be in XLSX format.
- The first column must be Item No.
- The second column must be Quantity.
- Product identifiers must exist in Resico.
- Quantities must be numeric and greater than zero.
- The file should not contain merged cells, additional headings or formulas.
If product numbers or barcodes contain leading zeroes or many digits, format the Item No column as Text in Excel before entering or pasting the values.
What happens if the same product appears several times in the import file?
Duplicate product lines are combined during import.
For example, if the same product appears with quantities 2 and 3, the imported journal will contain a total quantity of 5. Review the imported lines before approving the journal.
Can I enter a negative quantity to reverse the transfer direction?
No. The quantity must be a positive number.
To move stock in the opposite direction, select the correct From location and To location. If the original transfer was already approved, create a new transfer journal with the locations reversed or undo the approval if permitted.
How can I correct a transfer made in the wrong direction?
- Open the approved journal using View entries.
- Click Undo approve.
- Correct From location and To location.
- Review all product lines and quantities.
- Approve the journal again.
If the original approved journal must remain unchanged for audit purposes, create a new transfer journal with the locations reversed.
Which date is used for the inventory movement?
The inventory movement uses the transfer date entered in the journal header.
Before approval, verify that the date is correct, especially when recording a transfer for a previous inventory or accounting period.
Why is the Return to list button unavailable?
A journal line may still be in edit mode.
Save or cancel the current line edit first. Then click Return to list.
Related Pages
- Adjustment Journals – for stock corrections rather than location transfers.
- Stock Take Journals – for inventory counts.
- Product List – to browse and filter products used in transfer journals.
- Product Card – to create or update individual products used in transfer journals.
- Administration – Users – manage permissions for accessing transfer journals.