
Overview
Stock Take journals are designed for performing physical inventory counts in Resico ERP. They provide a structured way to compare the system’s recorded stock quantities with the quantities counted during a stocktake, calculate differences and adjust inventory accordingly. Unlike other journal types, a Stock Take journal covers a complete inventory location: when you generate a journal, the system lists all products (or only those with non‑zero stock) at the selected location, along with their current quantities, and prompts you to enter the counted quantities. After saving the counted quantities you approve the journal to update inventory levels.
Who Can Use This
Only users with Stock Take journals permissions assigned in Administration → Users → Permissions can create, edit or approve stock take journals. Users with view Stock Take journals rights can see existing journals but cannot modify them.
Preconditions
- The user must have permission to view and edit Stock Take journals.
- Locations, VAT groups, units of measure and product data must be configured.
- There must be no other open stock take journal for the chosen location. Each location can have only one open stocktake at a time; otherwise the system prevents creation.
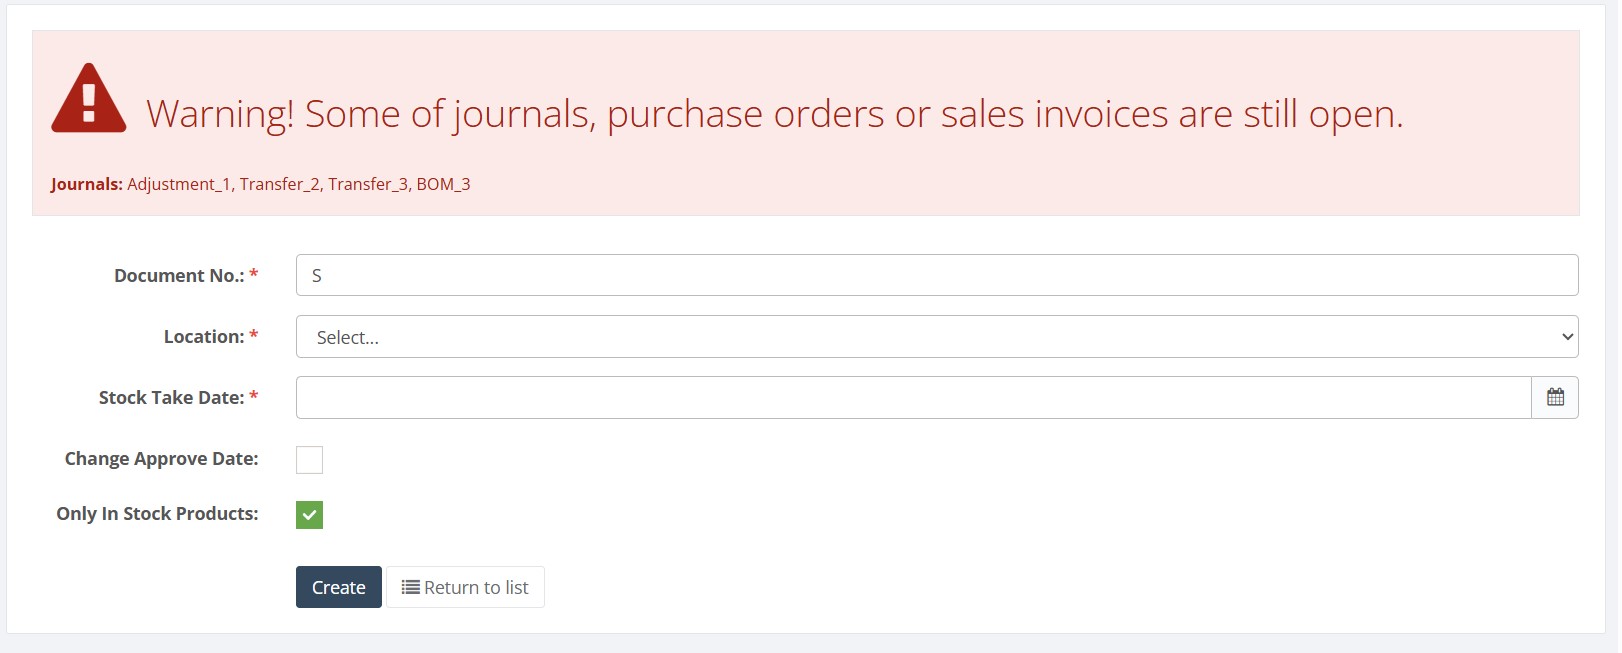
- Where possible, ensure that other inventory documents (journal corrections, transfer journals, BOM journals, purchase orders and sales invoices) are approved before performing a stock take. When open documents exist the system displays a red warning listing them.
Navigation
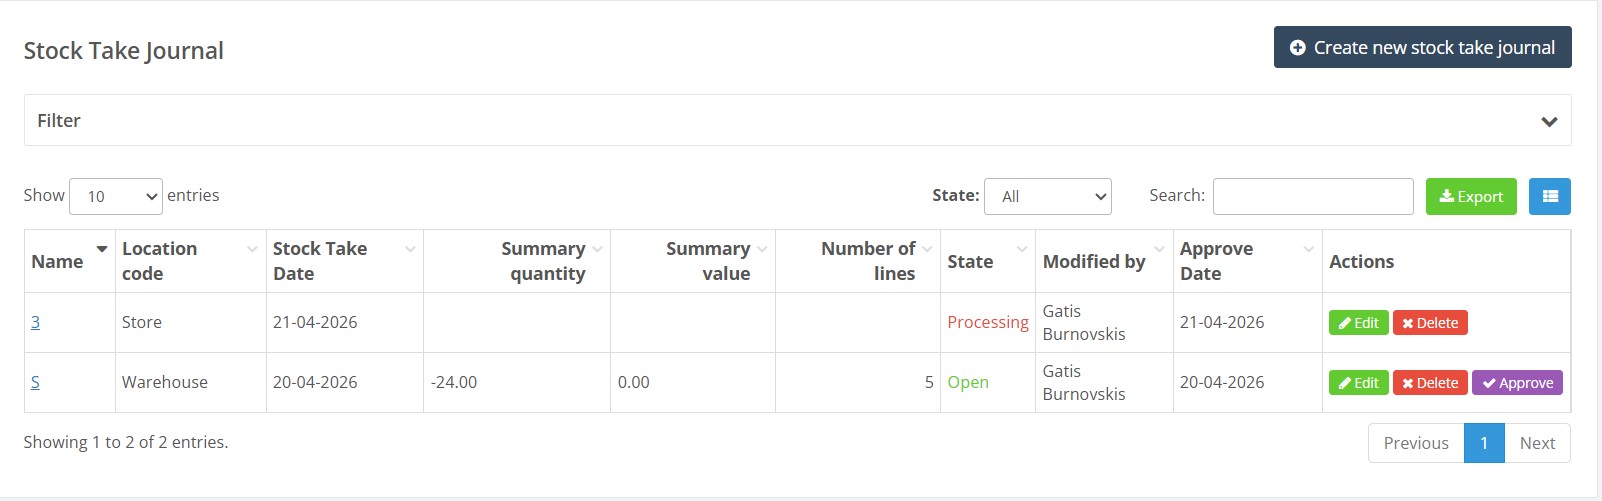
Go to ERP → Journals → Stock Take Journals. The list shows all stock take journals with columns for Name (document number), Location code, Stock Take Date, Summary quantity, Summary value, Number of lines, State, Modified by, Approve Date and Actions.
Step‑by‑Step Process
Viewing Stock Take Journals
- Open Journals → Stock Take Journals. Use the State dropdown (All, Open, Approved, Processing) and search fields to filter by name, location, dates or user.
- The list shows each journal’s details. Open journals display actions to Edit or Delete and a purple Approve button. Approved journals provide a View entries action; lines are read‑only.
- The blue column‑customization button in the upper‑left corner allows adding, removing or reordering columns. The green Export button exports the journal list to Excel.
Creating a New Stock Take Journal
- From the list page, click Create new stock take journal.
- If there are any open journals, purchase orders or sales invoices, a red warning banner appears listing those documents, review them and approve or close them if necessary to ensure an accurate stock snapshot.
- Complete the header fields:
- Document No. – required; unlike other journals, the system does not generate a default number so you must enter your own.
- Location – required; select the warehouse or store for which the stocktake will be performed.
- Stock Take Date – required; enter the date on which the physical count took place. If the stocktake happened yesterday but you are entering data today, set the date to yesterday.
- Change Approve Date – optional; tick this box to show an additional Approve Date field. Use it when the stocktake and approval occur on different dates; the system records the inventory adjustment on the approve date while preserving the stocktake date.
- Only In Stock Products – optional; when checked, the generated journal will include only products with non‑zero system stock at the selected location. Leave unchecked to include all products.
- Click Create. The system generates the journal and processes lines. A status message appears (e.g., Processing lines (Success 201/201)) while lines are created.


Editing Stock Take Lines
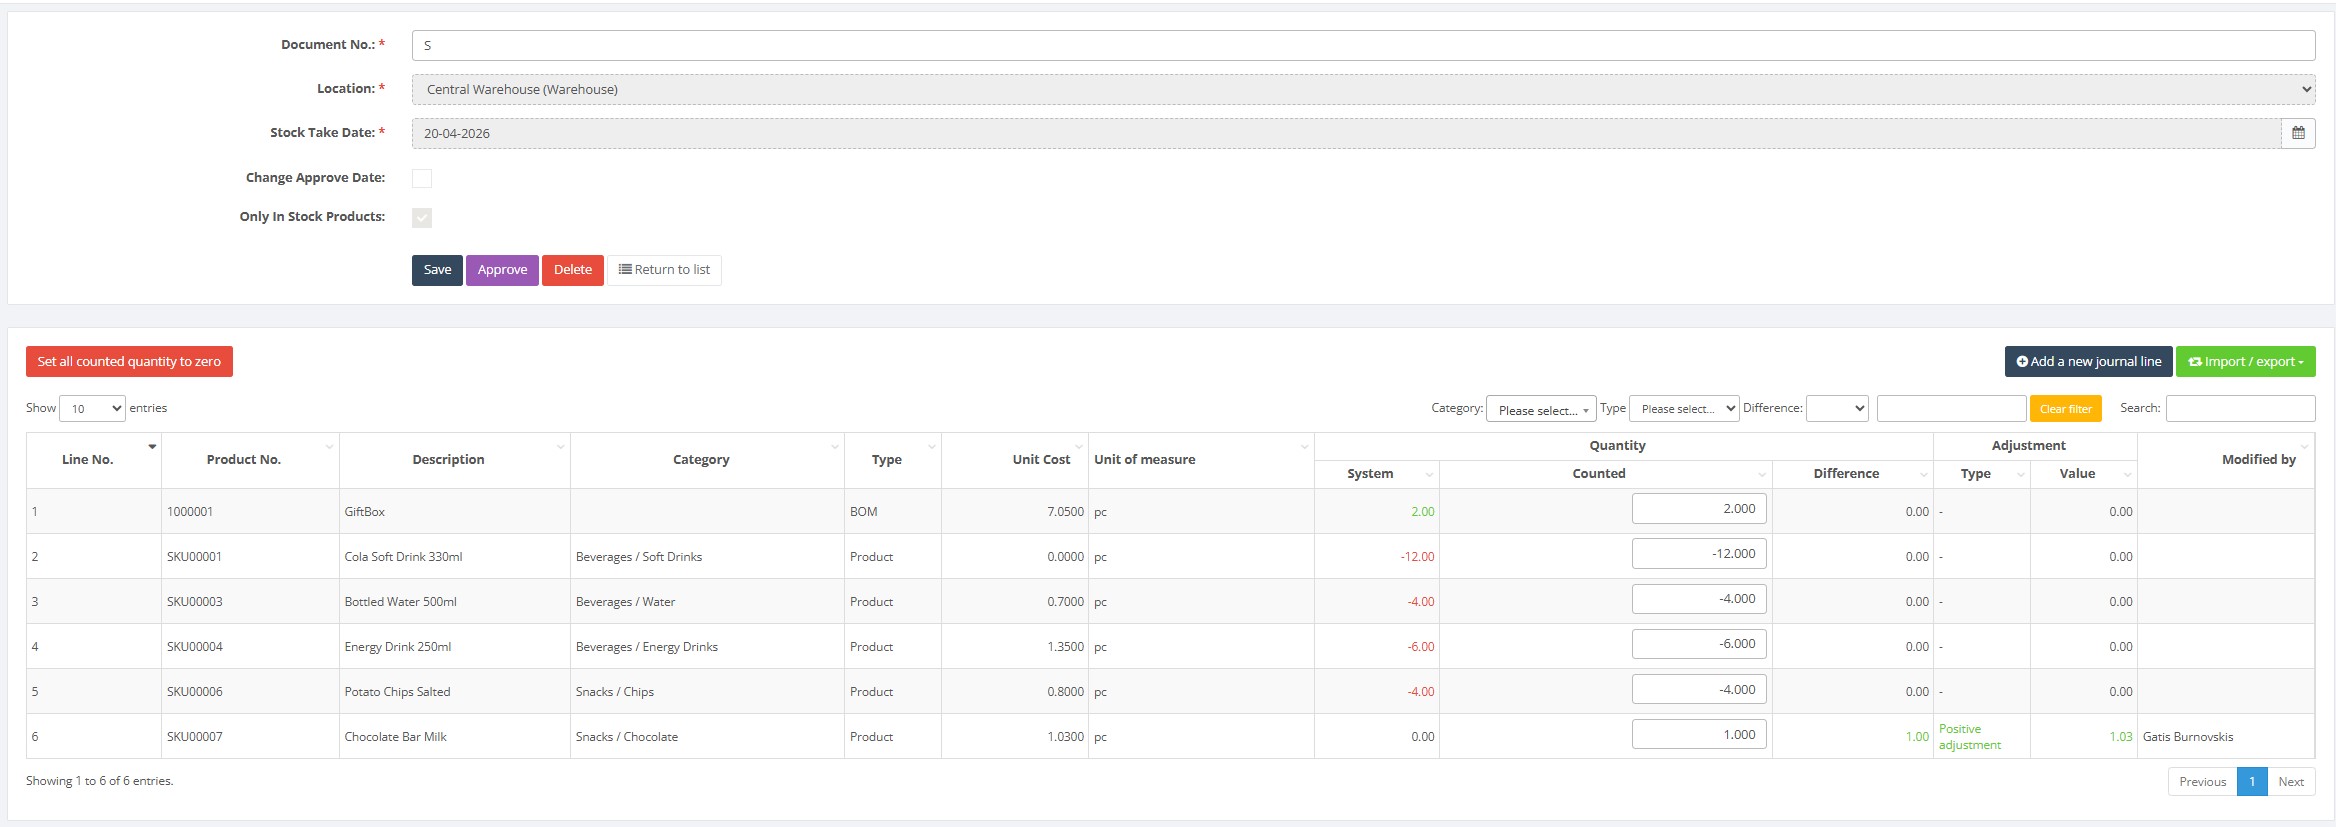
- After creation, the journal opens in edit mode. The header fields become read‑only. A button to Add a new journal line allows you to manually include additional products not generated automatically.
- The lines table lists each product with columns: Line No., Product No., Description, Category, Type, Unit cost, Unit of measure, System quantity, Counted quantity, Difference, Adjustment Type, Value and Modified by. System quantity shows the stock according to the system; Counted quantity initially equals System quantity. Update the Counted field with the actual counted quantity for each item. The Difference column automatically calculates Counted minus System, and the Adjustment Type and Value columns show whether stock will increase or decrease and by what value.
- Use the filters above the lines table to restrict the list by product category, type or difference (e.g., show only items where the counted quantity differs from the system quantity). A search field allows quick lookup by product number or description.
- The Import / export dropdown provides options to Import journal lines and Export journal lines (XLSX). To import counted quantities, download the provided Excel template and enter your data. The file must be in XLSX format with two columns: Item No (product number, barcode or alias up to 50 characters) and Quantity counted (numeric). Use the exported XLSX template and keep the required columns Item No and Quantity counted. After import, review the journal lines and confirm that products missing from the file have retained the expected counted quantity. Importing is useful when your physical count is recorded using a scanning device or spreadsheet, as it reduces manual entry errors.
- If product numbers or barcodes contain leading zeroes or many digits, format the Item No column as Text in Excel. Otherwise, Excel may modify the identifier and the product may not be found during import.
- Before approving: Filter the journal by differences and review all positive and negative adjustments. Confirm the location, Stock Take Date and, if used, Approve Date. Approval updates inventory and the journal becomes read-only.
- Click Save in the header to save your changes. The journal remains in Open status and can be edited further.
- Return to the journal list. The new stock take journal will appear with status Open and actions to Edit, Delete or Approve.
Approving the Stock Take
- Once all counted quantities have been entered and verified, return to the stock take journal list and click the purple Approve button for the journal. Approving posts the differences to inventory—items whose counted quantity exceeds the system quantity will increase stock, and items with deficits will decrease stock accordingly.
- After approval, the journal’s status changes to Approved and it becomes read‑only. The Actions column now shows View entries. If further adjustments are necessary, you must create a new stock take journal or perform adjustment journals.
Required Fields
- Document No. – must be unique, cannot be left blank and may contain up to 255 characters. The document number should consist of letters, digits or separators such as hyphens or underscores; spaces and special characters are not allowed.
- Location – required; select a location (code up to 20 characters). Only locations without open stock take journals are available.
- Stock Take Date – required; if Change Approve Date is selected, Approve Date is also required.
- Counted quantities – every line defaults to the system quantity; update counted quantities for any item that differs. Missing counted quantities are treated as equal to system quantity and will not generate an adjustment.
Validation Rules
- A location may have only one open stock take journal at a time. Attempting to create another will result in an error.

- Document number must be unique and cannot contain spaces or special characters (system will alert if invalid).

- Stock take date must not be in the future. Approve date must be on or after the stock take date.
- The journal cannot be approved while there are unsaved changes or missing required fields.
- If Change Approve Date is selected and Approve Date is left blank, an error appears on save.
- Document numbers may be up to 255 characters. Use letters, digits, hyphens or underscores; spaces and other special characters are not permitted.
- Location codes must be valid and up to 20 characters in length.
- Product identifiers (Item No) may be up to 50 characters and must match existing products.
- Counted quantities must be numeric (decimals allowed). Negative counted quantities are permitted when negative stock is expected.
Common Errors
- Red warning banner – a red warning listing open journals, purchase orders or sales invoices means there are documents that may affect stock. Review and approve them before proceeding for accurate results.
- “Location already has open stock take journal” – you attempted to create a stock take journal for a location that already has one in open status. Finish or delete the existing journal before creating a new one.
- Missing mandatory fields – if Document No., Location or Stock Take Date is blank, the system will not allow creation.
- Import errors – importing counted quantities from a file requires the correct template structure; mismatched columns or invalid product numbers will cause an error. Export a blank template first to ensure correct formatting.
- Import file format – The import file must be an XLSX spreadsheet with two columns (Item No and Quantity counted) and the correct column names. Using CSV files or incorrect column names will result in failure.
Troubleshooting
- If you cannot select a location when creating a stock take journal, verify that there is no existing open stock take for that location and that you have access rights to it.
- If the journal takes a long time to process lines, ensure you selected the appropriate Only in stock products option. Including all products at a location with a large catalog may require more processing time.
- If lines disappear after filtering, clear the filter fields or click the Clear filter link to restore the full list.
- To correct an approved stock take, you must create a new stock take journal or use adjustment journals to correct quantities. Approved stock take journals cannot be edited.
- For large stocktakes, consider using the import feature: export the journal lines, enter counted quantities in the spreadsheet, and import the file back into the journal. This reduces manual entry errors.
Frequently Asked Questions
Why can’t I select a location when creating a Stock Take journal?
A location can have only one Open Stock Take journal at a time.
Go to ERP → Journals → Stock Take Journals, clear the filters and check whether an Open journal already exists for the location. Complete or delete the existing journal before creating a new one.
Why does the Stock Take journal show a red warning?
The warning indicates that open inventory documents may still affect the stock quantities at the selected location. These may include purchase orders, sales invoices, adjustment journals, transfer journals or BOM journals.
Review the listed documents and approve, complete or close them before continuing with the stocktake. Otherwise, the System quantity may not represent the final inventory position.
What does Only In Stock Products do?
When Only In Stock Products is selected, the journal includes only products whose system quantity is not zero at the selected location.
Leave the option unselected if products with a zero system quantity must also be counted. This is useful when a physically found product may have a system quantity of zero.
Why does the Stock Take journal take a long time to generate?
Generating the journal may take longer when the selected location contains a large product catalogue, especially when Only In Stock Products is not selected.
Wait until the Processing status is complete. Do not create another journal or refresh the page repeatedly while journal lines are being generated.
Why is the Counted quantity already filled in?
The Counted quantity initially equals the System quantity.
Change the Counted quantity only for products where the physical count differs from the system balance. An unchanged value produces no inventory adjustment.
How is the difference calculated?
The journal calculates the difference using the following formula:
Difference = Counted quantity − System quantity
- A positive difference increases inventory.
- A negative difference decreases inventory.
- A zero difference creates no adjustment.
Why does a product show zero System quantity?
The System quantity represents the product balance at the selected location and Stock Take Date.
Check that:
- The correct location is selected.
- The Stock Take Date is correct.
- The product existed in the system on that date.
- Relevant purchase, sales, transfer and adjustment documents were approved.
- The product is assigned to the expected location.
Why can’t I find a product in the Stock Take journal?
Check that:
- The product exists in the Product List.
- The product number, barcode or alias is correct.
- The product is active.
- The correct location and Stock Take Date were selected.
- The journal was not created with Only In Stock Products when the product’s system quantity was zero.
If the product was not generated automatically, use Add a new journal line to add it manually.
Why did the Stock Take import fail?
Check the import file before trying again:
- The file must be in XLSX format.
- The first column must be Item No.
- The second column must be Quantity counted.
- Product identifiers must exist in Resico.
- Quantities must be numeric.
- The file should not contain merged cells or additional heading rows.
Use the template exported from the journal instead of creating a new spreadsheet manually.
Why are barcodes with leading zeroes not recognized during import?
Excel may remove leading zeroes or convert long barcodes into scientific notation.
Format the Item No column as Text before entering or pasting product numbers and barcodes. Verify that the complete identifier is still visible before importing the file.
What happens if a product is missing from the import file?
Missing products keep their existing Counted quantity. By default, this is equal to the System quantity, so no adjustment is created for those products.
Review the journal after import and use a difference filter to confirm that all intended products were counted.
Can I enter a negative Counted quantity?
A negative Counted quantity should be entered only when negative physical stock is intentionally expected and permitted by the company’s inventory procedure.
In a normal physical stocktake, verify negative quantities carefully before approving the journal.
Why can’t I approve the Stock Take journal?
Before approving the journal, check that:
- The journal is in Open status.
- Document No., Location and Stock Take Date are entered.
- Approve Date is entered if Change Approve Date is selected.
- All Counted quantities are numeric.
- Any line currently being edited has been saved or cancelled.
- The journal has finished processing its lines.
- You have permission to edit and approve Stock Take journals.
Which date is used for the inventory adjustment?
The Stock Take Date records when the physical inventory count took place.
If Change Approve Date is enabled, the inventory adjustment is posted using the selected Approve Date while the original Stock Take Date is retained for reference.
The Approve Date must be the same as or later than the Stock Take Date.
Why are products or journal lines missing from the list?
Active filters may be hiding the lines.
- Clear the search field.
- Remove category, product type and difference filters.
- Click Clear filter.
- Check whether the journal list is filtered by Open, Approved or Processing.
Can I edit an approved Stock Take journal?
No. An approved Stock Take journal is read-only.
If a quantity must be corrected, create an Adjustment Journal for the individual correction or create a new Stock Take journal if a complete recount is required.
How should I correct a counting mistake found after approval?
For an isolated product, create an Adjustment Journal with the required stock correction.
If several products or the complete location must be counted again, create a new Stock Take journal after confirming that no other Open Stock Take journal exists for that location.
How can I review only products with stock differences?
Use the Difference filter above the journal lines to display only products where the Counted quantity differs from the System quantity.
Review these lines before approval and export them to XLSX if an additional audit or supervisor check is required.
Related Pages
- Adjustment Journals – increase or decrease stock quantities outside of a full stocktake.
- Transfer Journals – move stock between locations.
- BOM Journals – produce or disassemble bill‑of‑materials products.
- Product List – manage products included in stocktakes.
- Product Card – create and update individual products.
Video Material