
Overview
The POS Layouts section is used to configure the button layout that appears on POS terminals.
A POS layout defines which buttons are available on the POS screen, where they are placed and what each button does when pressed by the cashier. Layouts are organised into groups, and each group can be assigned to specific locations or POS terminals.
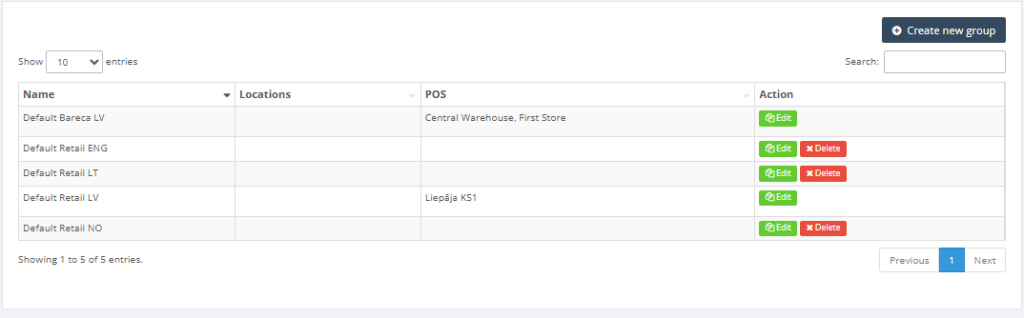
From the POS Layouts list, users can see the layout group name, assigned locations, assigned POS terminals and open the layout editor using the Edit action.
Important: Creating new layout groups or changing POS assignments may be restricted depending on user permissions. In the demonstration environment, existing layouts can be reviewed and edited, but new groups and assignments are managed by Resico support.
What Is a POS Button?
A POS button is an action button used by the cashier during sales. Each button has a function, for example adding a product, applying a discount, opening the cash drawer, registering a payment, printing a report or switching to another layout.
Some buttons work immediately when pressed. Other buttons use additional settings or the value entered by the cashier before pressing the button.
Example: if the cashier enters 10 and then presses a percentage discount button, the value 10 may be used as a 10% discount. If the cashier enters 20 and then presses a cash payment button, the value 20 may be used as the payment amount.
Who Can Use This
Users with POS configuration rights can edit POS layouts. In controlled or demo environments, only Resico support can create new layout groups, delete layout groups or change assignments between layouts, locations and POS terminals.
Because layout changes directly affect how cashiers work on the POS, changes should be tested before being used in live sales.
Preconditions
- The user must have Retail setup rights.
- The user must have access to POS layout editing.
- The POS terminal must be assigned to the correct POS group or location.
- Required products, payment methods, reports, layouts and other setup values must already exist in Resico.
- If a button uses a specific parameter, for example payment method or product, that value must be configured before it can be selected.
Navigation
Select Retail Setup → POS Layouts to open the POS layout group list.
To edit an existing layout group, click Edit in the corresponding row.
Step-by-Step Process
- Open Retail Setup → POS Layouts.
- Review the available layout groups. Each row shows the group name, assigned locations, assigned POS terminals and the edit action.
- Click Edit to open the layout editor.
- Review the POS layout grid. The grid represents how the buttons will appear on the POS terminal.
- Move existing buttons by dragging them to another position.
- Click Add button to create a new POS button.
- Select the required button function.
- Configure the required parameters, if the selected function requires them.
- Enter a clear button name and choose a suitable button colour.
- Click Save to save the layout.
- If the updated layout is not visible on the POS terminal, synchronize the POS terminal.
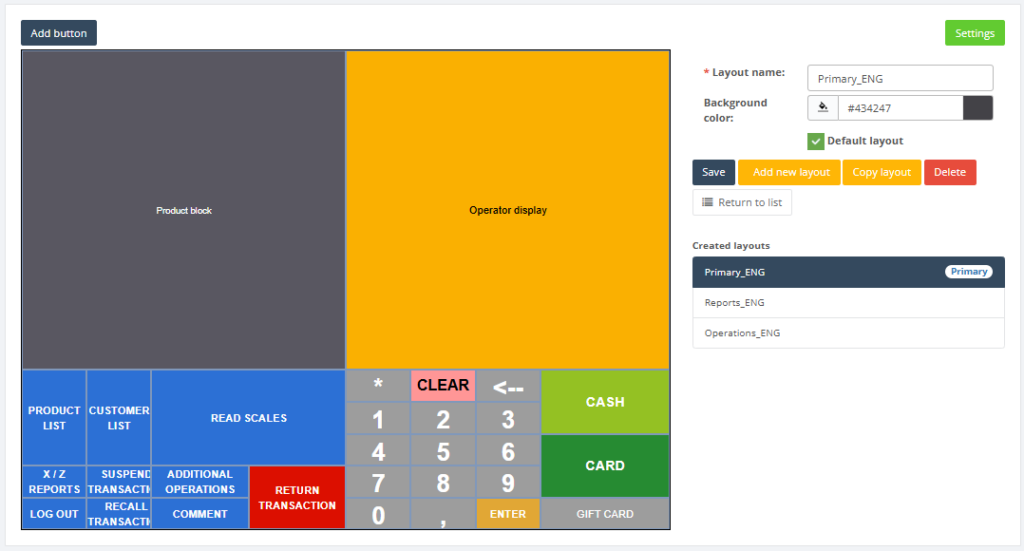
Layout Editor Fields
- Layout name – Name of the selected layout. This field is mandatory.
- Background color – Defines the background colour of the layout. This is optional, but recommended for visual clarity.
- Default layout – Defines whether this layout is used as the default layout for the group.
- Add button – Adds a new button to the layout.
- Save – Saves layout changes.
- Add new layout – Creates another layout inside the same group, if the user has permission.
- Copy layout – Creates a copy of an existing layout.
- Delete – Deletes the selected layout, if the user has permission.
- Return to list – Returns to the POS layout group list.
How Button Functions Work
Each POS button has a selected function. The function defines what happens when the cashier presses the button.
Some functions require additional parameters. For example, a payment button must know which payment method to use, a product button must know which product to add, and a layout change button must know which layout to open.
Some functions also use the cashier input field. This means that the cashier can enter a number or text before pressing the button, and the entered value will be used by the function.
Common Button Function Types
Product and quantity buttons
- Product search – Adds a selected product to the basket.
- Product List – Opens the product list. If the cashier has entered text, the product list is filtered by that text.
- Open Product Grid – Opens a quick product selection grid. If the cashier enters a quantity before pressing the button, the selected product is added with that quantity.
- Qty – Sets the quantity before product selection.
- Set qty – Changes the quantity of the selected or last product line.
- Change price – Changes the price of the selected or last product line.
- Read scale – Reads weight from connected scales, if scales are configured.
Discount and surcharge buttons
- % Discount line – Applies a percentage discount to the selected or last product line.
- % Discount total – Applies a percentage discount to the whole basket.
- Discount total amount – Applies a fixed amount discount to the basket.
- Void line discount – Removes a discount from a selected product line.
- Void discounts – Removes discounts from products in the basket.
- Surcharge – Adds a percentage surcharge to the basket.
Important: Percentage discounts must be between 0 and 100. Surcharge values above 100 are not allowed.
Payment buttons
- Tender – Registers payment using the selected payment method.
- Void payment – Cancels the selected or last partial payment.
- Issue return voucher – Prints a return voucher during a return process.
- Show gift card info – Shows gift card status information.
The Tender function can be configured with a payment method. If the cashier enters an amount before pressing the payment button, that amount may be used as the payment amount. If the button is configured not to ask for the amount, the system uses the exact basket amount.
Basket and transaction buttons
- Basket list – Opens the basket or sales invoice list on the POS.
- Suspend transaction – Suspends the current transaction.
- Recall transaction – Opens a suspended transaction.
- Void transaction – Cancels the whole basket.
- Void line – Cancels the selected or last product line.
- Enter – Processes the value entered in the cashier input field, similar to scanning a barcode.
- Clear – Clears the cashier input field.
- Back space – Deletes entered characters one by one.
Cash drawer and cash movement buttons
- Open drawer – Opens the cash drawer.
- Declare starting amount – Registers starting cash amount for the shift.
- Bank drop – Registers cash removal to bank.
- Safe drop – Registers cash removal to safe.
Cash movement actions require enough cash in the cash drawer. The system does not allow removing more cash than is available. After a cash movement action, a document is printed.
Reports and synchronization buttons
- X report – Prints an X report.
- Z report – Prints a Z report.
- GUI report – Shows report information on screen.
- Card terminal end of day – Sends the card terminal end-of-day report to the bank.
- Synchronize – Synchronizes POS data. It can be configured to synchronize only the layout or all POS data.
Important: Synchronization cannot be performed while a transaction is active. After synchronization, the cashier may need to log in again.
Customer and comment buttons
- Customer list – Opens the customer list. If text is entered before pressing the button, the system searches by that text.
- Comment order line – Adds a comment below a product line.
- Receipt line comment – Adds a comment to the product line and prints it on the receipt.
- Toggle line comment – Adds or removes a comment from the selected or last product line.
- Comment – Adds a general comment to the transaction.
Restaurant buttons
- Open Table – Opens or selects a table and allows products to be added to the table order.
- Print bill – Used for restaurant billing flow.
- Update order – Updates an existing table or guest order.
- Select course – Selects or assigns a meal course.
System and layout buttons
- Log off – Logs out the current cashier. This cannot be done while a transaction is active.
- Change layout – Switches to another POS layout. This can require administrator authorization.
- Open EJ viewer – Opens the electronic journal viewer.
- Input – Adds predefined text to the cashier input field.
- Add function – Allows multiple functions to be combined under one button.
Recommended Button Setup Guidelines
- Use short and clear button names, for example Cash, Card, Product Search or Z Report.
- Group similar buttons together, for example payment buttons in one area and report buttons in another area.
- Use colours consistently to make the POS screen easier to understand.
- Avoid placing high-risk buttons, such as Z report, Void transaction or Bank drop, where cashiers may press them accidentally.
- For sensitive actions, consider using administrator authorization where available.
- Test new or changed buttons before using the layout in live sales.
Required Fields
- Layout name – Required.
- Button function – Required for each functional POS button.
- Function parameters – Required only for functions that need additional setup, for example payment method, product, report type or target layout.
- Background color – Optional, but recommended.
Validation Rules
- Layout names should be unique within the same layout group.
- A POS layout must belong to a layout group before it can be used on terminals.
- The POS terminal must be assigned to the correct group or location.
- Buttons with predefined products require the product to exist in Resico.
- Buttons with predefined payment methods require the payment method to exist in setup.
- Percentage discounts must be between 0 and 100.
- Surcharge percentage cannot exceed 100.
- Cash drop functions cannot remove more cash than is available in the cash drawer.
- Log off and synchronization cannot be used while a transaction is open.
Common Errors
- Buttons are not visible on POS – Check whether the correct layout is set as default and assigned to the correct POS group.
- Layout changes are not visible on POS – Save the layout and synchronize the POS terminal.
- Button does nothing when pressed – Check whether the button has a function and required parameters.
- Discount is not applied – Check whether the entered value is valid.
- Payment button asks for amount unexpectedly – Check whether the payment button is configured to ask for the amount.
- Partial payment remains open – The entered payment amount is smaller than the basket balance.
- Cash drop fails – The cash drawer may not contain enough available cash.
- Synchronization cannot be completed – Check whether an active transaction is open.
- Cashier cannot log off – Finish or cancel the active transaction first.
Troubleshooting
Button is not visible on POS
- Verify that the layout was saved.
- Verify that the correct layout group is assigned to the POS terminal.
- Verify that the edited layout is set as default, if default layout is used.
- Synchronize the POS terminal.
- If the button is still missing, contact Resico support.
Button is visible but does not work
- Check whether the button has a function assigned.
- Check whether the function requires additional parameters.
- Check whether the cashier must enter a value before pressing the button.
- Check whether the current transaction state allows the function to be used.
- Check whether the cashier has the required permissions.
Payment does not complete the transaction
- Check whether the entered payment amount covers the full basket balance.
- Check whether the payment method is correctly selected in the button settings.
- Check whether the button is configured to ask or not ask for the amount.
- If a partial payment was created, complete the remaining amount with the same or another payment method.
When to Contact Support
Contact Resico support if:
- You need to create or delete POS layout groups.
- You need to assign POS terminals or locations to another layout group.
- A configured button does not appear on the POS after saving and synchronization.
- A button function does not behave as expected.
- You need to configure a combined button with multiple functions.
- You are not sure which POS button function should be used for a specific cashier workflow.
When contacting support, provide the layout group name, POS terminal name, button name, expected result, actual result and screenshots if available.